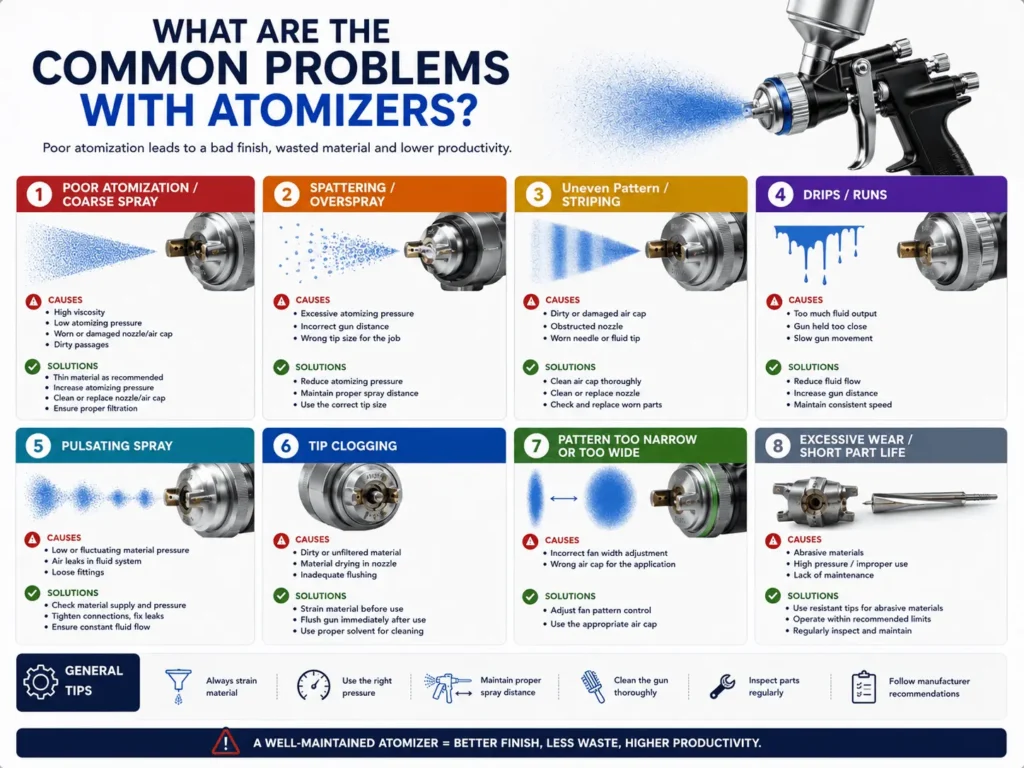
Atomizers can develop clogged passages, uneven spray patterns, poor droplet breakup, dripping, pressure loss, excessive overspray, material buildup, vibration, and premature component wear. Most of these problems come from contamination, incorrect air or fluid settings, worn parts, unsuitable coating viscosity, or weak maintenance routines.
The good news is that many atomizer faults give an early warning. A fan may become heavier on one side. Droplets may grow larger. Paint use may rise even though production stays the same. Catching these changes early can prevent coating defects, wasted material, and an unexpected line stoppage.
In this blog post, we discuss the most common atomizer problems, what causes them, and how operators can correct them without relying on guesswork.
What problems occur most often in industrial atomizers?
The most common atomizer problems are clogging, poor atomization, distorted spray patterns, dripping, pulsation, overspray, unstable flow, air or fluid leaks, coating buildup, and wear around the tip, needle, air cap, bell cup, seals, or turbine.
These faults often overlap, although the likely cause depends partly on the type of atomizer used. A worn nozzle may increase fluid flow and produce larger droplets. An operator may then raise air pressure to compensate, creating more overspray without correcting the worn component.
A useful troubleshooting process starts with the visible symptom. Check the spray pattern, droplet size, fluid delivery, air supply, coating condition, and mechanical parts in that order. This approach usually exposes the cause faster than changing several settings at once.
Clogged fluid passages and nozzle openings
A clogged atomizer cannot deliver material evenly. The restriction may sit inside the fluid tip, nozzle orifice, air cap, paint valve, hose, filter, or rotary bell feed tube.
Small particles are enough to disturb the spray. Dried coating, pigment agglomerates, dirt, rust, skin from an open paint container, and fragments from damaged seals can all obstruct narrow passages.
What causes an atomizer to clog?
Clogging usually begins when coating remains inside the atomizer for too long, filtration is too coarse, cleaning is incomplete, or the material starts curing before it leaves the system.
Two-component coatings create a greater risk because their usable pot life begins once the materials are mixed. Paint left inside the applicator beyond its stated pot life may harden and require full disassembly.
Waterborne coatings may also dry around exposed openings when airflow passes across the tip during a production pause. High-solids materials can leave deposits faster because less solvent is available to keep residue wet.
How can a clogged atomizer be fixed?
Stop spraying, isolate all energy sources, relieve fluid pressure, and follow the equipment maker’s cleaning procedure. Remove the nozzle, air cap, bell cup, or other approved service parts and clean them with a compatible fluid.
Soft brushes and approved cleaning tools are safer than wire, drill bits, or hard metal picks. A small scratch inside an orifice can change flow rate and spray shape even after the blockage has gone.
Repeated clogging points to a system fault rather than a single dirty tip. Inspect paint filtration, container cleanliness, hose condition, coating pot life, flushing cycles, and production shutdown routines.
Poor atomization and droplets that are too large
Poor atomization occurs when the coating does not break into droplets of the required size. The spray may look wet, coarse, grainy, stringy, or heavy.
Large droplets create uneven film build and may contribute to runs, orange peel, poor color distribution, and slow flash-off. They can also reduce coverage in recessed areas or around complex parts.
Why does an atomizer produce coarse droplets?
Low atomizing air pressure is a common cause in air-spray systems. Air pressure must be strong enough to break the fluid stream apart, though simply turning it higher is not always the right answer.
Other causes include:
- Fluid pressure that is too high for the available atomizing air
- Coating viscosity above the intended range
- Material temperature that is too low
- A fluid tip that is too large
- A damaged air cap
- Blocked air passages
- Low rotary bell speed
- Excessive material flow through a rotary cup
- Incorrect bell cup shape or size for the application
Droplet size depends on the relationship between material flow, air energy, fluid properties, nozzle geometry, and atomizer speed. Changing one setting can affect several parts of the process.
How should poor atomization be corrected?
Start with the coating itself. Confirm viscosity, temperature, mix ratio, pot life, and solids content. A material outside its working range may continue spraying badly regardless of pressure changes.
Next, inspect the tip and air cap for residue or damage. Check air pressure while the atomizer is operating, not only while the system is idle. Pressure can fall once several applicators trigger at the same time.
Increase atomizing air gradually until the droplets become fine enough for the finish. Airless systems may need more fluid pressure or a smaller tip. Rotary atomizers may need a speed correction, lower flow, or a different cup.
The goal is the lowest pressure or speed that produces a stable, fully broken spray. Excess energy often creates new problems such as bounce-back, dry spray, and rapid component wear.
Uneven or distorted spray patterns
A healthy atomizer should produce a repeatable pattern with balanced material distribution. A crooked fan, split pattern, heavy edge, narrow band, or one-sided spray usually signals contamination, wear, or an air imbalance.
Pattern faults become expensive on automated lines because a robot repeats the same defect across every part. The problem may remain hidden until film-thickness checks or final inspection reveal it.
Why is the spray pattern heavier on one side?
One-sided spray often comes from a partially blocked air-cap hole. Air exits unevenly, pushing the coating toward the opposite side.
A damaged nozzle, loose air cap, off-centre fluid tip, worn needle, or incorrectly fitted component may create the same symptom. Cleaning the cap and rotating it 180 degrees can sometimes help locate the fault. When the heavy side moves with the cap, the cap is usually responsible.
Robot position can also make an otherwise healthy fan appear uneven. A tilted applicator places one side closer to the surface, producing heavier film build on that side.
What causes tails or fingers at the edge of a spray fan?
Tails are dense lines along the outer edges of a fan. They are common when an airless or air-assisted stream is not fully broken apart.
Low fluid pressure, a blocked tip, a worn tip, material that is too thick, or an orifice that is too large may create this shape. Air-assisted equipment may need a small increase in atomizing air to pull the tails into the main fan.
Pressure should not be raised without checking the tip. A worn or oversized orifice may still spray poorly at high pressure while placing extra load on the pump.
Why does a pattern become narrow or split?
A narrow pattern may come from low horn air pressure, clogged shaping-air passages, or an incorrect air-cap setting. A split pattern often appears when shaping air is too high for the fluid flow, leaving less coating in the centre.
Reduce shaping air in small steps and inspect the cap. Check whether the fluid tip and air cap are a matched pair. Parts may fit physically while producing the wrong flow balance.
Atomizer dripping after the spray cycle
Dripping occurs when material continues leaving the atomizer after the trigger signal has ended. Even a small drop can land on a panel and leave a crater, sag, dirt nib, or heavy spot.
The leak can also dry around the tip and cause a blockage during the next cycle.
What causes an atomizer to drip?
The needle may not be seating fully against the fluid tip. Dried paint, wear, misalignment, weak closing force, damaged seals, or an incorrectly adjusted needle can leave a small path for material.
Excessive fluid pressure can overcome the closing mechanism. Slow trigger-air exhaust may delay valve closure in an automatic gun. A failing valve, weak spring, or damaged seat may produce the same result.
Rotary atomizers can release residual material when valve timing, cup cleaning, or shaping air is wrong. Coating trapped inside the bell cup may continue moving outward after material flow stops.
How can dripping be stopped?
Clean and inspect the needle and seat. Replace both as a matched set when wear is visible, since fitting a new needle against a damaged seat may not restore a tight seal.
Check trigger-air pressure, valve timing, fluid pressure, and return-line performance. Confirm that the needle closes before atomizing air shuts off where the equipment design calls for that sequence.
A production fix that only wipes the tip between cycles does not solve the cause. It also increases contamination around the applicator.
Spitting and sudden bursts of material
Spitting is an irregular burst of large droplets or an interrupted spray. It often occurs at trigger-on, trigger-off, or after a short pause.
The resulting marks are hard to hide because they contain far more coating than the surrounding spray.
Why does an atomizer spit?
Air trapped in the fluid line is one of the most common causes. Loose suction fittings, a low paint level, a leaking pump seal, or incomplete priming may allow bubbles into the system.
Other causes include a loose fluid tip, damaged needle seat, blocked vent, dirty valve, incorrect trigger sequence, or coating beginning to cure inside the gun.
Material circulation problems can also create pressure changes near the atomizer. When the valve opens, the stored pressure may release as a sudden burst.
How is atomizer spitting corrected?
Bleed air from the fluid circuit and check every connection on the suction side of the pump. Look for foam or bubbles in the return line.
Inspect the fluid tip, needle, packing, and valve. Automatic applicators should receive full atomizing air before material starts flowing, followed by a controlled closing sequence at the end of the spray cycle.
Pressure traces can reveal a short spike that the eye cannot see. Comparing the trace from a healthy station with the faulty station may expose a regulator, valve, or timing problem.
Pulsating or unstable material flow
A pulsating spray grows and shrinks instead of remaining steady. The defect may appear as light and dark bands, changing fan width, or repeated thick and thin areas on the part.
Pressure pulsation can come from the paint supply system even when the atomizer itself is clean.
What causes atomizer pulsation?
A worn pump, failing regulator, clogged filter, restricted hose, air pocket, unstable material level, or pressure-control fault can make flow rise and fall.
Reciprocating pumps naturally create pulses, though dampeners and regulators should reduce them before the material reaches the atomizer. A damaged dampener or incorrect charge can make those pulses visible in the spray.
Rotary atomizers may show unstable flow when the metering pump, colour changer, dosing valve, or feed tube is partially restricted.
How can unstable flow be diagnosed?
Watch the fluid-pressure gauge while the atomizer sprays. A steady gauge does not always rule out rapid pressure changes, so an electronic pressure sensor may be needed on automated systems.
Compare static pressure with dynamic pressure. A large drop during spraying suggests restricted supply, inadequate pump output, or an undersized hose.
Check filters one at a time rather than replacing everything together. The pressure reading before and after each filter can locate the restriction.
Excessive overspray and low material transfer
Overspray is coating that misses the part or bounces away from it. Some loss is unavoidable, but a sudden increase often signals incorrect atomizer settings or poor part presentation.
High overspray raises paint use, booth loading, filter replacement frequency, cleaning time, and emissions from solventborne materials.
What causes too much overspray?
Atomizing air or fluid pressure may be higher than needed. The atomizer may also be too far from the part, aimed at the wrong angle, moving too slowly, or producing a fan wider than the target area.
Coating viscosity that is too low can produce very fine droplets that follow booth airflow instead of reaching the surface. Excessive rotary speed may cause a similar result.
Electrostatic systems lose transfer performance when grounding is weak, voltage is low, electrodes are dirty, or the part already carries a thick insulating coating.
How can overspray be reduced?
Test the spray at a lower atomizing pressure while watching pattern quality. Reduce pressure until the pattern begins to deteriorate, then move slightly above that point.
Match fan width to the part, correct robot distance and angle, and check whether the path sprays beyond panel edges. Review trigger points so paint does not begin too early or end too late.
Electrostatic applicators need clean electrodes and a sound ground path. Hooks, skids, and contact points often collect coating over time, raising resistance between the part and ground.
Paint buildup on the air cap or rotary bell
Material buildup changes airflow, spray shape, balance, and droplet formation. It can begin as a thin film and later break away as large contamination particles.
The front of the atomizer may look clean from a distance while small shaping-air holes are already partly covered.
Why does material collect on an atomizer?
Air pressure that is too high may create recirculation around the air cap and pull wet coating back onto its face. Poor needle timing can wet the tip before atomizing air reaches full flow.
Incorrect gun distance, booth airflow, robot angle, and electrostatic attraction may also draw droplets toward the applicator.
A rotary bell may collect coating on the rear surface when shaping air is wrong, the cup is damaged, cleaning cycles are weak, or the atomizer moves through overspray from another station.
How should buildup be controlled?
Clean the atomizer at planned intervals before deposits harden. Review automatic purge and solvent-cleaning programs rather than relying only on manual cleaning at the end of a shift.
Inspect booth airflow and neighbouring spray zones. One robot may contaminate another even though both atomizers are operating correctly.
Do not soak complete atomizer assemblies unless the manufacturer permits it. Solvent can enter bearings, air passages, electrical parts, and seals.
Worn nozzles, tips, needles, and air caps
Wear develops slowly, which makes it easy to miss. A nozzle may continue spraying while its flow rate, fan width, and droplet size move away from the original setting.
Operators may unknowingly compensate by changing pressure, robot speed, or paint flow. This hides the worn part while process consistency continues to decline.
What are the signs of nozzle wear?
Common signs include higher material use, a wider fan, heavier film build, poor pattern edges, larger droplets, frequent pressure adjustment, and loss of repeatability.
Abrasive pigments and filled coatings wear orifices faster. High pressure also raises the speed at which material passes through the tip, increasing erosion.
Flow testing gives a clearer answer than visual inspection alone. Spray clean test fluid at a fixed pressure for a fixed period, then compare the measured volume with the baseline for a new tip.
When should atomizer parts be replaced?
Replace a part when cleaning no longer restores its normal flow or pattern. Damaged air holes, scratches, oval openings, chipped bell edges, leaking seats, swollen seals, and loose mechanical fits are strong replacement signs.
Service limits should come from the equipment manual and the plant’s own process records. A part does not need to fail completely before it becomes too inconsistent for production.
Air and fluid leaks
Leaks may appear outside the atomizer or remain hidden inside it. Both types affect performance.
A fluid leak can contaminate the booth, robot wrist, hoses, cables, and finished parts. An air leak may reduce pressure at the cap or prevent an automatic valve from opening and closing at the right speed.
Where do atomizer leaks usually occur?
Common leak points include hose fittings, packing cartridges, O-rings, needle seals, valve bodies, regulators, manifolds, quick connections, and colour-change blocks.
Solvent can swell or soften a seal that is not compatible with the coating system. Dry seals may crack, while aggressive cleaning can wash away approved lubricant.
How should leaks be handled?
Depressurize the system before loosening any fitting. High-pressure coating can penetrate skin and cause a medical emergency even when the wound looks small.
Locate the exact leak rather than tightening every connection. Excessive torque may distort a seat, cut an O-ring, or crack a fitting.
Use the approved seal material and lubricant. A replacement with the correct dimensions but the wrong chemical resistance may fail after only a few shifts.
Rotary atomizer vibration and abnormal noise
Rotary atomizers introduce faults that do not occur in fixed spray nozzles. A bell cup may rotate at tens of thousands of revolutions per minute, making balance and cleanliness especially sensitive.
Vibration should never be treated as a normal side effect of high speed. It can damage the turbine, bearings, cup, robot, and surrounding equipment.
What causes a rotary atomizer to vibrate?
Uneven coating buildup on the bell cup is a frequent cause. A bent, chipped, incorrectly mounted, or unbalanced cup may also vibrate.
Contaminated turbine air, bearing damage, incorrect air pressure, loose mounting parts, and internal wear can create noise or unstable speed.
A small deposit becomes more serious at high rotational speed because centrifugal force magnifies the imbalance.
What should operators do when vibration begins?
Stop the atomizer according to the approved shutdown procedure. Do not continue running it to see whether the vibration clears.
Inspect the cup for deposits, damage, and correct seating. Review speed data, turbine-air quality, and maintenance history.
A cup with a chipped edge or suspected structural damage should be replaced. Grinding, sanding, or reshaping it in the plant can make balance worse.
Weak electrostatic charging and poor wraparound
Electrostatic atomizers charge coating droplets so they are attracted to a grounded part. Weak charging reduces wraparound and raises paint loss behind the part.
The spray may still look normal, which means the fault can be missed unless current, voltage, transfer, or film build is checked.
Why does electrostatic performance fall?
Dirty electrodes, weak grounding, damaged high-voltage cables, moisture, conductive contamination, excessive coating flow, and incorrect distance can lower charging performance.
A thick coating layer may insulate the part during later passes. Deep recesses can also resist deposition because of the Faraday cage effect, where charged droplets collect around the opening instead of entering the cavity.
How can electrostatic atomizer problems be corrected?
Clean the electrode and inspect the high-voltage system under the maker’s safety procedure. Measure resistance from the part to a verified ground point.
Clean hooks, hangers, skids, and contact areas. A clean atomizer cannot correct a poorly grounded part.
Compare live voltage and current values with the baseline from a healthy production run. Recorded kilovolt output can serve as a troubleshooting baseline, while a sudden change may point to contamination, cable damage, or a failing high-voltage unit.
Coating viscosity and temperature problems
An atomizer can be mechanically healthy and still spray badly when the coating reaches it at the wrong viscosity or temperature.
Viscosity affects flow through the orifice and the energy needed to create droplets. Temperature changes viscosity, so a process set correctly in the morning may behave differently later if paint temperature drifts.
What happens when coating is too thick?
Thick coating needs more pressure or atomizing energy. It may produce coarse droplets, tails, narrow patterns, slow flow, and poor surface appearance.
Operators sometimes add pressure to compensate. That may work temporarily, though it can increase pump load and tip wear.
What happens when coating is too thin?
Thin coating may atomize into very fine droplets, increasing overspray and dry spray. It can also run or sag because more wet material reaches the same area.
Check the mix ratio, thinner addition, solvent loss, material age, and temperature before adjusting the atomizer.
A practical atomizer troubleshooting order
Random adjustments make faults harder to trace. Change one item at a time and record what happened.
A sensible inspection order is:
- Confirm the exact symptom on a spray card or test panel.
- Check coating viscosity, temperature, mix ratio, and usable life.
- Inspect filters, hoses, and material supply.
- Check dynamic air and fluid pressures.
- Clean the tip, air cap, bell cup, and approved passages.
- Inspect wear parts and seals.
- Verify trigger timing, robot position, speed, and distance.
- Check electrostatic grounding or rotary speed where fitted.
- Compare the current settings with a known good production record.
- Replace suspect parts only after the earlier checks are complete.
Spray cards are useful because they turn a vague complaint into visible evidence. Date and label each card with pressure, flow, viscosity, tip size, atomizer speed, and material batch.
How can atomizer problems be prevented?
Atomizer reliability comes from clean material, stable settings, correct parts, and scheduled inspection. Daily cleaning alone is not enough when filters, pressure regulators, hoses, and coating controls receive little attention.
Create a baseline for every approved material and part combination. Record fan shape, flow rate, air pressure, fluid pressure, viscosity, temperature, robot distance, and rotary speed.
Track material use per part as well. Rising consumption may reveal nozzle wear or overspray before the finish becomes visibly unacceptable.
Maintenance intervals should reflect actual operating conditions. Abrasive coatings, high production volumes, short pot-life materials, and frequent colour changes may call for closer inspection than a general calendar-based schedule.
Training also matters. Operators should know what a healthy spray sounds and looks like. A slight change in turbine tone, fan balance, or trigger response often appears before a major failure.
When does an atomizer need repair or replacement?
An atomizer needs professional repair when it has internal leakage, repeated pressure instability, abnormal vibration, weak electrostatic output, turbine trouble, damaged threads, or faults that return after cleaning and replacement of normal wear parts.
Replacement may make more sense when repair costs keep rising, parts are no longer supported, or the unit cannot hold the required flow and pattern within the process window.
The decision should be based on coating quality, downtime, paint waste, repair frequency, and safety rather than age alone. An older atomizer with stable output may still serve production well. A newer unit that repeatedly loses balance or leaks may already be costing more than it is worth.
Small spray changes deserve attention before they become large failures
Most atomizer failures do not begin with a complete shutdown. They begin with a slightly crooked fan, a few larger droplets, a slow pressure change, or a thin ring of dried coating around the tip.
Treat those signs as useful information. Clean the applicator correctly, check the material and supply system, compare settings with a known baseline, and replace worn parts before operators are forced to compensate for them.
A stable atomizer uses less coating, produces fewer rejected parts, and keeps the paint line predictable. That consistency begins with noticing small changes while they are still easy to correct.